朋友們近來討論一下ORCAD使用心得!
剛接觸ORCAD,有些興趣,各位老師們能談談心得嗎?大家交流一下.
全部回復(25)
正序查看
倒序查看
@yeming
說來話長了,先要建立一個模型,然后再設定參數,不是一句兩句話能講清的事.
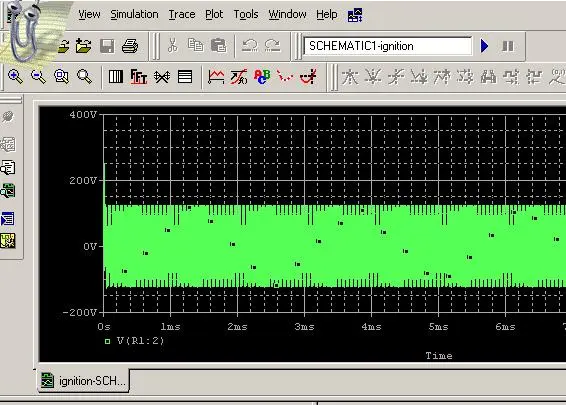
這是燈管運行仿真的結果,大家可以看到,在啟動時有一個尖峰,然后管壓穩定在100多伏,和實際相差無幾.
 500) {this.resized=true; this.width=500; this.alt='這是一張縮略圖,點擊可放大。\n按住CTRL,滾動鼠標滾輪可自由縮放';this.style.cursor='hand'}" onclick="if(!this.resized) {return true;} else {window.open('http://u.dianyuan.com/bbs/u/21/1094481681.jpg');}" onmousewheel="return imgzoom(this);">
500) {this.resized=true; this.width=500; this.alt='這是一張縮略圖,點擊可放大。\n按住CTRL,滾動鼠標滾輪可自由縮放';this.style.cursor='hand'}" onclick="if(!this.resized) {return true;} else {window.open('http://u.dianyuan.com/bbs/u/21/1094481681.jpg');}" onmousewheel="return imgzoom(this);"> 0
回復
@yeming
這是燈管運行仿真的結果,大家可以看到,在啟動時有一個尖峰,然后管壓穩定在100多伏,和實際相差無幾.[圖片]500){this.resized=true;this.width=500;this.alt='這是一張縮略圖,點擊可放大。\n按住CTRL,滾動鼠標滾輪可自由縮放';this.style.cursor='hand'}"onclick="if(!this.resized){returntrue;}else{window.open('http://u.dianyuan.com/bbs/u/21/1094481681.jpg');}"onmousewheel="returnimgzoom(this);">
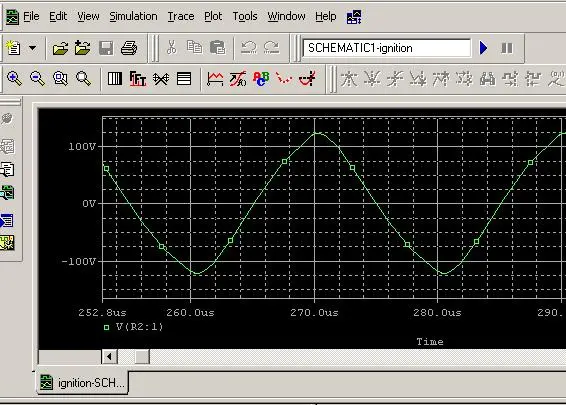
這是放大的仿真燈管電壓
 500) {this.resized=true; this.width=500; this.alt='這是一張縮略圖,點擊可放大。\n按住CTRL,滾動鼠標滾輪可自由縮放';this.style.cursor='hand'}" onclick="if(!this.resized) {return true;} else {window.open('http://u.dianyuan.com/bbs/u/21/1094490130.jpg');}" onmousewheel="return imgzoom(this);">
500) {this.resized=true; this.width=500; this.alt='這是一張縮略圖,點擊可放大。\n按住CTRL,滾動鼠標滾輪可自由縮放';this.style.cursor='hand'}" onclick="if(!this.resized) {return true;} else {window.open('http://u.dianyuan.com/bbs/u/21/1094490130.jpg');}" onmousewheel="return imgzoom(this);"> 0
回復
@yeming
這是燈管運行仿真的結果,大家可以看到,在啟動時有一個尖峰,然后管壓穩定在100多伏,和實際相差無幾.[圖片]500){this.resized=true;this.width=500;this.alt='這是一張縮略圖,點擊可放大。\n按住CTRL,滾動鼠標滾輪可自由縮放';this.style.cursor='hand'}"onclick="if(!this.resized){returntrue;}else{window.open('http://u.dianyuan.com/bbs/u/21/1094481681.jpg');}"onmousewheel="returnimgzoom(this);">
更清楚一點 500) {this.resized=true; this.width=500; this.alt='這是一張縮略圖,點擊可放大。\n按住CTRL,滾動鼠標滾輪可自由縮放';this.style.cursor='hand'}" onclick="if(!this.resized) {return true;} else {window.open('http://u.dianyuan.com/bbs/u/21/1094744847.gif');}" onmousewheel="return imgzoom(this);">
500) {this.resized=true; this.width=500; this.alt='這是一張縮略圖,點擊可放大。\n按住CTRL,滾動鼠標滾輪可自由縮放';this.style.cursor='hand'}" onclick="if(!this.resized) {return true;} else {window.open('http://u.dianyuan.com/bbs/u/21/1094744847.gif');}" onmousewheel="return imgzoom(this);"> 0
回復
@yeming
這是放大的仿真燈管電壓[圖片]500){this.resized=true;this.width=500;this.alt='這是一張縮略圖,點擊可放大。\n按住CTRL,滾動鼠標滾輪可自由縮放';this.style.cursor='hand'}"onclick="if(!this.resized){returntrue;}else{window.open('http://u.dianyuan.com/bbs/u/21/1094490130.jpg');}"onmousewheel="returnimgzoom(this);">
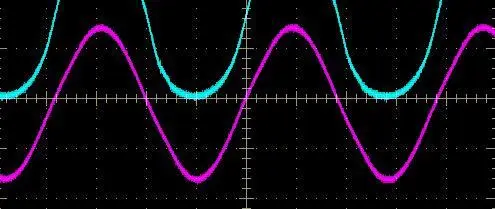
這是實測的波形
 500) {this.resized=true; this.width=500; this.alt='這是一張縮略圖,點擊可放大。\n按住CTRL,滾動鼠標滾輪可自由縮放';this.style.cursor='hand'}" onclick="if(!this.resized) {return true;} else {window.open('http://u.dianyuan.com/bbs/u/22/1097174534.jpg');}" onmousewheel="return imgzoom(this);">
500) {this.resized=true; this.width=500; this.alt='這是一張縮略圖,點擊可放大。\n按住CTRL,滾動鼠標滾輪可自由縮放';this.style.cursor='hand'}" onclick="if(!this.resized) {return true;} else {window.open('http://u.dianyuan.com/bbs/u/22/1097174534.jpg');}" onmousewheel="return imgzoom(this);"> 0
回復
@einfen
順便問一下,電阻的功率怎么設置,還是不需要設置?
更改電阻功率可參考以下步驟:
1、放置電阻元件,選中后右鍵,選Edit properties,然后在屬性里看PCB Footprint,系統默認的是AX/RC05;
2、關閉屬性編輯窗口,再次選中電阻,右鍵選link database part;


3、在最下面找到,封裝為AX/RC05的電阻,單擊。在右邊中間的位置會出現這個電阻的屬性框
將power項,選為可見,即在power后面的小框里打鉤,然后退出。power就顯示在電阻的屬性里面了
4、這時就可以再利用edit properties更改電阻的功率了。
說的有點啰嗦,有效就好
0
回復
@hsym_101584
更改電阻功率可參考以下步驟:1、放置電阻元件,選中后右鍵,選Editproperties,然后在屬性里看PCBFootprint,系統默認的是AX/RC05;2、關閉屬性編輯窗口,再次選中電阻,右鍵選linkdatabasepart;[圖片][圖片] 3、在最下面找到,封裝為AX/RC05的電阻,單擊。在右邊中間的位置會出現這個電阻的屬性框[圖片] 將power項,選為可見,即在power后面的小框里打鉤,然后退出。power就顯示在電阻的屬性里面了4、這時就可以再利用editproperties更改電阻的功率了。說的有點啰嗦,有效就好[圖片]
23貼中的圖


0
回復